PowerPoint Tips Blog

Helping you with presenting, PowerPoint, and speaking

  • Home
  • Blog
  • Tips
  • E-Store
  • Training
  • About
  • Affiliates
  • Advertise
  • Contact
Home » buttons

Use PowerPoint to create buttons for slides or a website

June 3, 2013 by Ellen Finkelstein 3 Comments

powerpoint-tips-create-slide-or-website-buttons-1

Buttons are graphics that you click to go to another location (perhaps another slide or another presentation), buy a product, subscribe to a newsletter, and so on.

powerpoint-tips-create-slide-or-website-buttons-2Most often, we think of buttons as being on a website, but you can put them in PowerPoint, too. When you put a button on a slide, you hyperlink it so that clicking it in Slide Show view takes you to another location. The concepts are similar. For more information about using hyperlinks in PowerPoint, see “Hyperlink to a specific slide in another presentation, or specific location in another file.”

You can use PowerPoint to create great buttons and I do this a lot.

Turn graphics into images

However you create the button, if you want to use it n a website, you’ll need to convert it to an image. You don’t need to do this step for a button that you hyperlink to another slide or presentation. I cover the procedure in my post, “Use PowerPoint as a graphics program.”

Once you create the image, you may have to resize it. It’s hard to tell in advance how big the button will be on a website. (You don’t have that problem when you use it on a slide.)  A good guideline is to decide how big you want the text to be — such as 14 points — and then fit the button around the text.

What’s unique about a button?

Have you ever noticed that buttons look like they should be clicked? What is it about a button that lets you know you can click it to go somewhere or buy something? There are a few properties that many buttons have:

  • They have descriptive text
  • They look slightly 3D, raised from the surface
  • They stand out from the rest of the slide or web page–a different border and fill color or gradient

Many website buttons look different in different situations, such as when you hover over or click the button. Doing this is beyond the scope of this post, but if you know how to do it, you can create slightly different buttons and use them in this way.

6 steps to create a button

powerpoint-tips-create-slide-or-website-buttons-1

Creating a button gives you the opportunity to use many formatting features of PowerPoint. Each button will be different, but here are 6 general steps that you can use. I’ve provided some links to further details.

  1. Insert a shape (I often like the rounded rectangle) and type the text that you want for the button. Bold text is usually best because it stands out more.
  2. Make the outline thicker. On the Format tab, choose Shape Outline, Weight.
  3. Change the fill color. On the Format tab, choose Shape Fill. You may also need to change the text color at this point so that it’s legible.
  4. Add a bevel for a 3D look.  See “Create professional-looking 3D effects with bevels.”
  5. Add a shadow if you want. A shadow also gives a 3D appearance. See “Slides that pop! Using the 3rd dimension on a slide–Part I: Shadows.”
  6. Add a highlight. A highlight makes the button look as if light is shining on it. See “Getting a shiny Web 2.0 look in PowerPoint-Part II: Highlights.”

Download some free buttons!

I have some free buttons that you can download in image format on my Change the World Marketing website. Feel free to use them! If you do Internet Marketing, I invite you to sign up for my Change the World Marketing newsletter while you’re there. Just click the button that says, “Click here to get your free master plan + tips.” And of course I made that button in PowerPoint.
Filed Under: Images, Shapes & text boxes Tagged With: buttons, hyperlink, PowerPoint buttons, web buttons

Control movies with buttons

January 16, 2002 by Ellen Finkelstein 8 Comments

Adding movies to your PowerPoint slides is a great way to add a multimedia element — your CEO speaking to shareholders or employees, a product demo, or a computer tutorial.

Play, Pause, and Stop buttons give you extra control in case you want to stop to answer questions or discuss something in more detail. They also look professional.

You’ll get the most reliable results with AVI, WMV, and MPG (MPEG) files.

The first step is to move your movie file to the same folder as your PowerPoint presentation. This is very important; if you don’t do this and later move your PowerPoint presentation — for example, onto another computer — your movie won’t play!

To insert the movie file, choose Insert > Movies and Sounds > Movie from File. Select the file and click OK. A message pops and you can choose to have the movie play automatically when you display the slide or only when clicked. Choose the When Clicked button. This creates a Pause action for the movie, so that it doesn’t play until you click it.

You can change this later by displaying the Custom Animation task pane, clicking the object’s item in the task pane, and choosing Start with Previous or Start after Previous from the drop-down list.

Go into slide show view and click the movie to make sure that it plays. Then return to normal view.

Follow these steps to create a play, pause, or stop button for the movie:

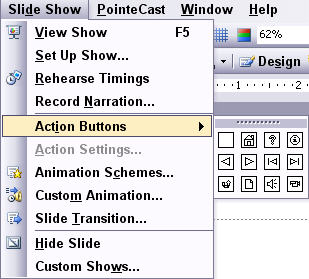
  1. Choose Slide Show > Action Buttons and click a button. You can drag the palette off the menu (it’ll be there next time!) so that it stays open as you work. You can also find this palette on the AutoShapes menu of the Draw toolbar. You can use the blank button for the Pause and Stop buttons and create your own graphic.
  2. the slide show view

    the slide show view

  3. Click on the slide to insert the default size button or drag to specify your own size.
  4. The Action Settings dialog box opens. Choose the None option and click OK.
  5. Do this for all three buttons. I made the graphics for the Pause and Stop buttons with simple rectangles. Then group the rectangles with their buttons so that each button is one object. For the Play button I used the Forward or Next button.
  6. buttons created

    buttons created

  7. To add a Play action to the movie, display the Custom Animation task pane and select the movie on the slide. On the task pane, choose Add Effect > Movie Actions > Play.
  8. Click the new Play action on the task bar and choose Timing from the drop-down list.
  9. In the Play Movie dialog box, if you don’t see anything below the Triggers button, click the Triggers button to display the trigger options.
  10. Click the Start Effect on Click of option. Choose Action button: Forward or next from the drop-down list.
  11. Click the Start Effect on Click of option

    Click the Start Effect on Click of option

  12. To test the button, go into slide show view. When you click the Play button, the movie should play. (OK, actually, you can click anywhere on the slide to play the movie.)
  13. Repeat steps 5-9, this time choosing the Stop action and the Stop button. Note that the Stop button stops the movie and winds it to the end; if you click the Play button, the movie starts from the beginning.
  14. You should already have a Pause action listed in the task pane. With the movie selected, repeat steps 6-9, choosing the Pause button. The Pause action both pauses the movie and restarts it where it left off.

Test your buttons and have fun controlling your movie!

Filed Under: Multimedia: Music, sound & video Tagged With: buttons, graphics, movies, PowerPoint, presentations, slides

Create invisible buttons

August 8, 2001 by Ellen Finkelstein 2 Comments

In a discussion with Dr. Pavel Samsonov, a professor at the University of Louisiana at Lafayette, the topic of invisible buttons came up. I had encountered them before, so I thought I would explain.

Invisible buttons are AutoShapes with no fill and no line that have a hyperlink attached to them. You use them for two purposes:

  • If you’re navigating through the presentation, you may want your navigation to seem invisible to create a magical effect. The button may be small or may cover the entire slide.
  • If viewers are navigating themselves, you may want them to be able to click anywhere on a slide to execute the hyperlink. In this case, the invisible button covers the entire slide.

For example, let’s say you create a quiz that students will navigate by themselves. You may add hyperlinks from a question slide to a Correct and Incorrect slide, depending on which answer the person clicks. Then, you can hyperlink the Correct slide to the next question and the Incorrect slide back to the original question so viewers can try again.

By covering the entire Correct and Incorrect slides with an invisible, rectangular AutoShape, students just click anywhere to get to the right place.

To make the process easier, attach the hyperlink to your rectangle before you make it invisible. Then double-click it and use the Format AutoShape dialog box to change the line to No Line and the fill to No Fill.

In PowerPoint 2007, invisible buttons made this way don’t work! Instead, you need to make the fill 100% transparent. Click the Format tab and then the Shape Fill drop-down list. Right-click the shape and choose Format Shape. In the Fill pane, drag the Transparency slider all the say to the right, and click Close.

Filed Under: Hyperlinks Tagged With: buttons, PowerPoint, PowerPoint 2007, presentations, slides

Free Video Training!

13 Techniques that Will Make Designing Your Slides EASY!

And get the PowerPoint Tips Newsletter with tips and resources for presenters. Plus 5 bonus tips!

BirdSend Email Marketing Tool

PresenterMedia

1-on-1 Presentation Coaching

Recent Posts

Recent Posts:

Recent Posts

  • New SmartArt layouts, including numbered lists and Meet the Team options
  • New Remove Background options in PowerPoint
  • Managing complex backgrounds
  • Creating images with AI: The end of stock photo sites?
  • Format multiple headshots for consistency

Connect with me!

Connect with me on LinkedIn!


Search the site:

Search the site:

Ellen Finkelstein, Inc. · Fairfield, IA · Tel: 515-989-1832

Privacy, Refund, and Other Legal Stuff